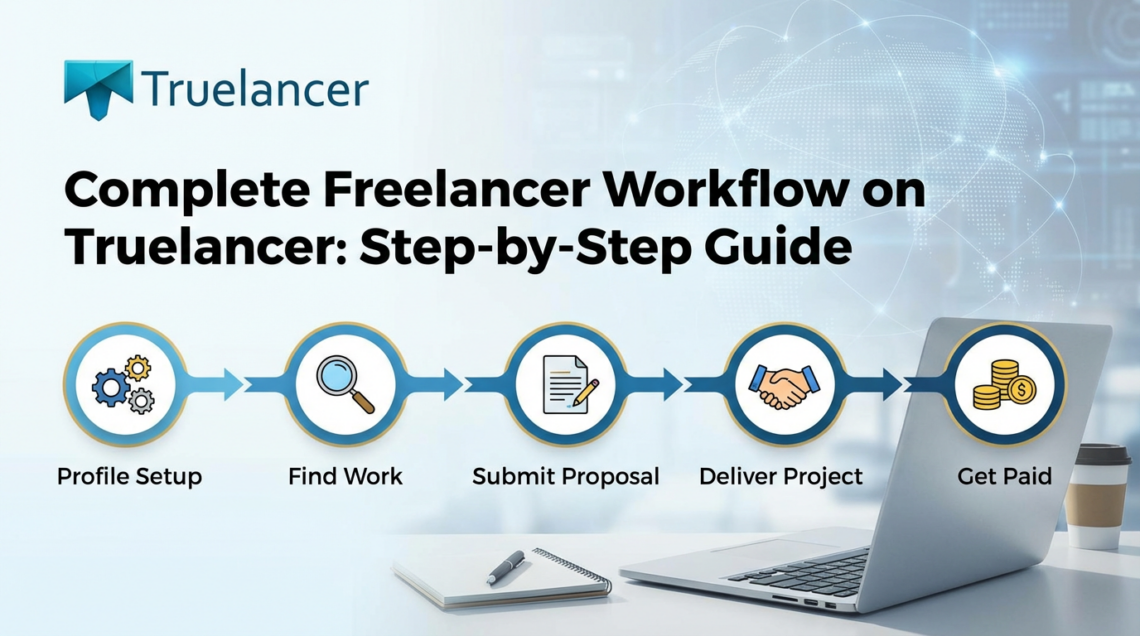
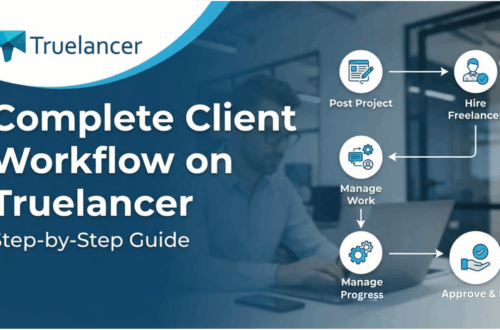
Freelancing success on Truelancer is not only about applying to projects, but it’s about using the platform workflow correctly: finding the right jobs, writing strong proposals, managing communication inside Workstream, securing payments via Safe Deposit (Escrow), closing projects properly, and collecting feedback that improves your profile ranking.
This guide explains the complete freelancer workflow on Truelancer, including the exact click-by-click process, what each option does, and how every step works, from applying to jobs to receiving final feedback.
Step 1: Complete Your Freelancer Profile (100%) and Reach the Dashboard
Before you begin applying to projects, your profile should be 100% completed. A complete profile matters because many clients check your profile before they decide whether to talk to you or accept your proposal.
What a complete profile typically includes
- Professional title and summary (what you do)
- Skills and categories
- Work history / experience
- Portfolio and past samples (very important for trust)
- Education and certifications (optional but helpful)
- Profile photo and availability
✅ Once your profile is completed, you are redirected to your Freelancer Dashboard.
Step 2: Understand the Freelancer Dashboard (Your Main Control Center)
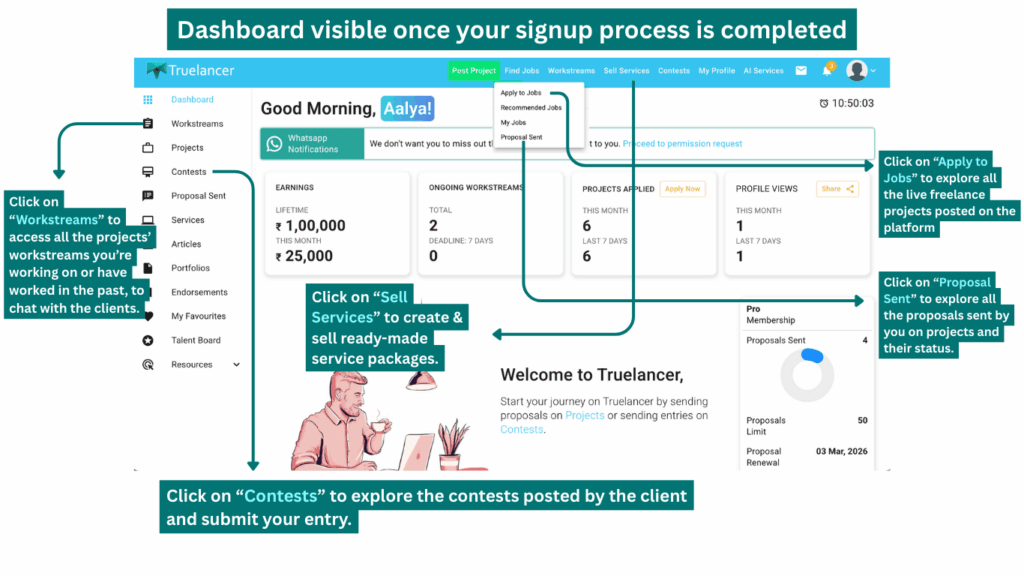
The Dashboard is the starting point for everything you do on Truelancer: job applications, messages, active projects, and platform updates.
What you can do from the dashboard (and why it matters)
Truelancer gives freelancers three earning paths:
Option 1: Apply to Jobs (Freelance Projects)
What it is: Apply to client-posted projects by sending proposals.
Why it matters: This is the most common workflow and the best way to get consistent work.
How it works: You send proposals → client reviews → Workstream → payment via escrow → delivery → feedback.
Option 2: Sell Services
What it is: Create ready-made service packages that clients can directly buy (fixed scope + fixed price).
Why it matters: This helps you earn faster without bidding, especially for repeatable work.
Example: “Logo Design: 3 concepts in 2 days.”
Option 3: Contests
What it is: Clients host contests where multiple freelancers submit entries; the best entry wins.
Why it matters: Great for creative freelancers who want visibility and quick wins.
📌 In this blog, we focus on the Freelance Projects workflow.
Step 3: Go to “Find Jobs” (Where Freelancers Discover Projects)
What to click
From the top header/navigation, click:
✅ Find Jobs
What happens next
You will see four sub-options. Each one has a specific purpose and should be used correctly.
Step 4: “Apply to Jobs”
1) Apply to Jobs
Click path: Find Jobs → Apply to Jobs
What it shows: A full list of live projects posted by clients across categories.
Why it exists: This is for manual browsing; you discover projects yourself.
When to use it: When you want full control over which projects you apply to.
2) Recommended Jobs
Click path: Find Jobs → Recommended Jobs
What it shows: Projects recommended based on your profile, skills, and activity.
Why it exists: Saves time and reduces irrelevant browsing.
When to use it: Best for faster job discovery with higher relevance.
3) My Jobs
Click path: Find Jobs → My Jobs
What it shows: Projects posted by you (only if you posted a job as a client).
Why it exists: Some freelancers also hire others. This section helps manage those posts.
When to use it: Only if you have posted projects yourself.
4) Proposal Sent
Click path: Find Jobs → Proposal Sent
What it shows: All proposals you have submitted + their current status.
Why it exists: This is your tracking dashboard. It helps you monitor responses, access Workstreams, and manage applications.
When to use it: Daily. This is where you track progress and client responses.
Step 5: Open the Live Jobs List (Where Projects Are Listed)
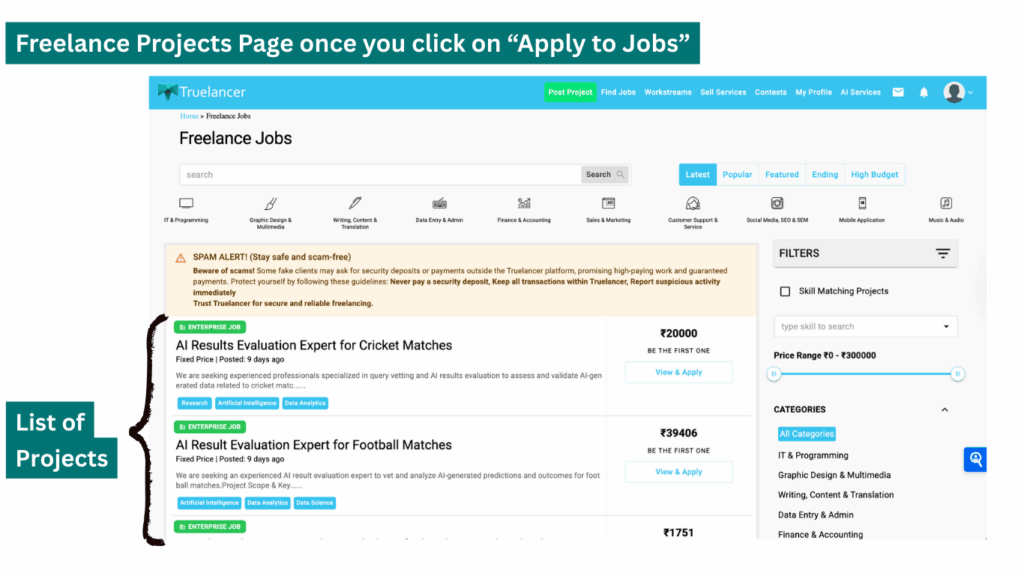
What to click
✅ Click: Apply to Jobs OR Recommended Jobs
What opens next
You will land on the Freelance Jobs Listing Page.
What you see on the Jobs Listing Page (and what each element means)
- Project title: What the client needs
- Budget: Client’s expected range
- Category / skills: Helps you filter relevance
- Posting time: Shows how fresh the project is
- Proposals count (if visible): Shows competition level
Why the Spam Alert banner matters
You may see a Spam Alert warning.
Purpose: Protect freelancers from scams and off-platform risks.
Best practice: Keep everything inside Truelancer (chat + payments). It ensures platform support can help if needed.
Step 6: Open a Project and Review the Project Details Page
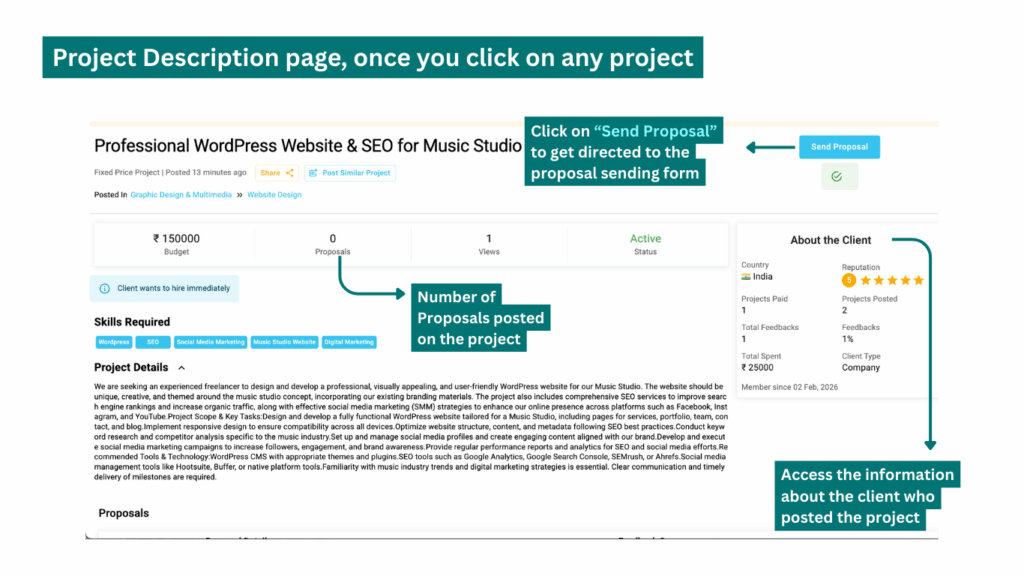
What to click
✅ Click on a project title from the jobs list.
What opens next
You land on the Project Details Page.
What to evaluate before sending a proposal (and why)
This step is important because applying blindly reduces success rate and wastes effort.
Check:
- Scope & deliverables (what exactly is required)
- Tools/skills requested (do you match them?)
- Deadline / urgency (can you realistically deliver?)
- Budget expectations (does it make sense for the scope?)
- Client credibility (rating, history, verification if shown)
✅ If you are confident you can deliver, proceed to send a proposal.
Step 7: Click “Send Proposal” (This Starts Your Proposal Submission)
What to click
✅ Click: Send Proposal
What opens next
A Proposal Submission Form opens.
This is the most critical part of the workflow, because in competitive projects, your proposal decides whether the client talks to you or ignores you.
Step 8: Fill the Proposal Submission Form
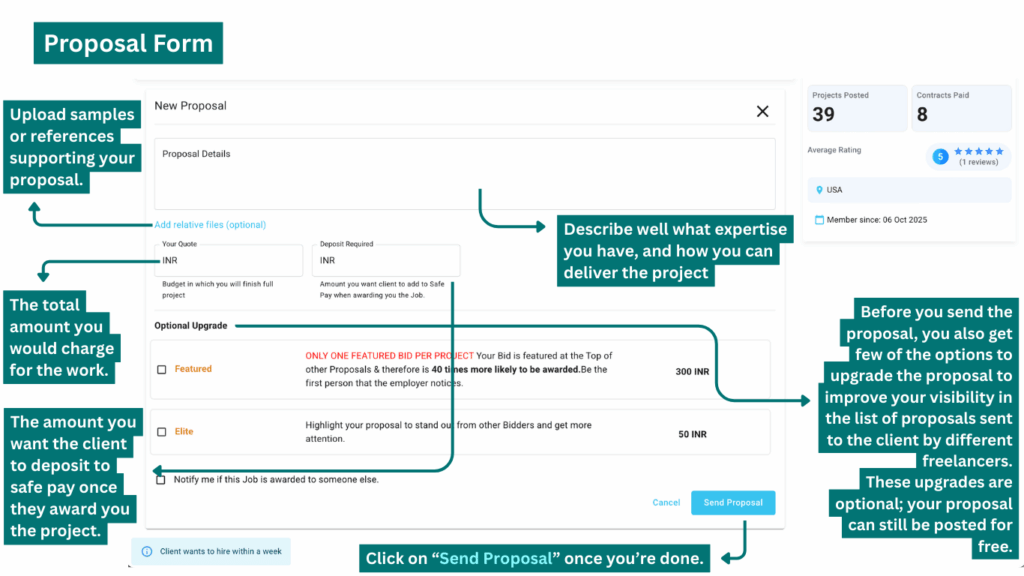
A) Proposal Details (Your Pitch)
What it is: Your written message to the client.
Why it matters: Clients compare proposals. A generic proposal reduces chances.
What to include in a strong proposal (simple structure that works)
- Personalized opening (mention the client’s requirement briefly)
- Understanding of the project (repeat goal in your own words)
- Your approach (how you will execute, steps, tools)
- Relevant proof (portfolio links, similar work, results)
- Timeline clarity (how long each part takes)
- A question or next step (invite discussion in Workstream)
📌 Purpose: A proposal is your “pitch + plan.” It helps the client trust that you can deliver.
B) Attach Relevant Files (Optional but powerful)
What it is: Upload samples or references supporting your proposal.
Why it matters: Proof builds trust faster than claims.
What to attach:
- Portfolio samples
- Case studies
- Screenshots of past work
- Draft concepts (only if quick and safe)
C) Your Quote / Budget
What it is: The total amount you charge for the work.
Why it matters: Client compares value vs price.
How to decide quote:
- Consider scope and effort
- Align with client budget if possible
- If higher than budget, justify clearly (better outcome, faster delivery, deeper expertise)
D) Deposit Amount (Safe Deposit / Escrow)
What it is: The amount you want the client to deposit once they accept your proposal.
Why it matters: This is payment security for both sides.
What is Escrow / Safe Deposit (in simple words)
Escrow means the client’s money is held securely by Truelancer and released only when:
- client approves a payment request (partial/final), or
- client approves completion
Benefits for freelancers:
- You avoid working without payment security
- You have confirmed funds before major delivery
- It reduces “client disappears after delivery” risk
Step 9: Proposal Upgrade Options
Truelancer shows proposal upgrade options in the form. These are optional and used to improve visibility.
1) Featured Proposal
What it offers: Your proposal is placed at the top and gets priority visibility.
Why it helps: Clients often review top bids first.
Important condition: Usually only one Featured bid per project is allowed.
When to use: On highly relevant, high-budget, high-competition projects.
2) Elite Proposal
What it offers: Highlights your proposal so it stands out visually.
Why it helps: In crowded proposal lists, it increases attention and clicks.
3) Notify me if awarded (Free)
What it offers: You get a notification if the job is awarded to another freelancer.
Why it helps: Saves time and helps you move on quickly.
✅ If you don’t want upgrades, you can still send proposals free of cost.
Step 10: Send Proposal and Understand What Happens Next
✅ Click: Send Proposal
What happens next
- Your proposal is submitted to the client
- You are redirected back to the project page
- A Similar/Recommended Jobs popup may appear
Similar jobs popup
Why it exists: It helps you apply to relevant jobs faster without searching again.
What to do: Open and apply if they match your skills.
Step 11: View Your Proposal on the Project Page
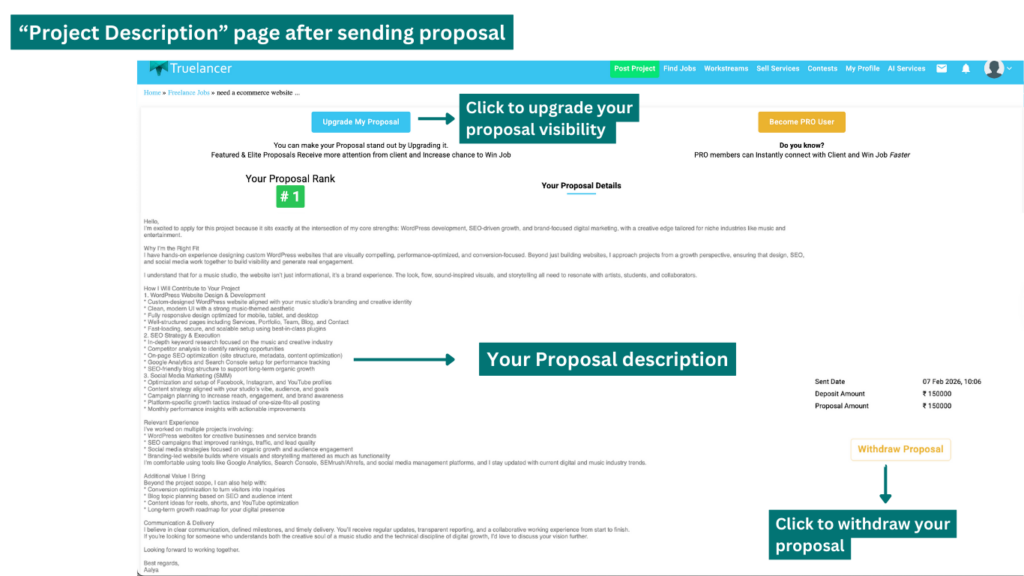
After submission, you may see your proposal displayed on the project page with options like:
- Upgrade Proposal
- Withdraw Proposal
Withdraw proposal (what it means)
Purpose: Allows you to cancel your proposal if needed.
When to withdraw:
- You applied mistakenly
- Scope changed
- You can’t commit to deadline
- You no longer want the project
Withdrawing early is better than accepting a project you can’t deliver.
Step 12: Track Everything via “Proposal Sent”
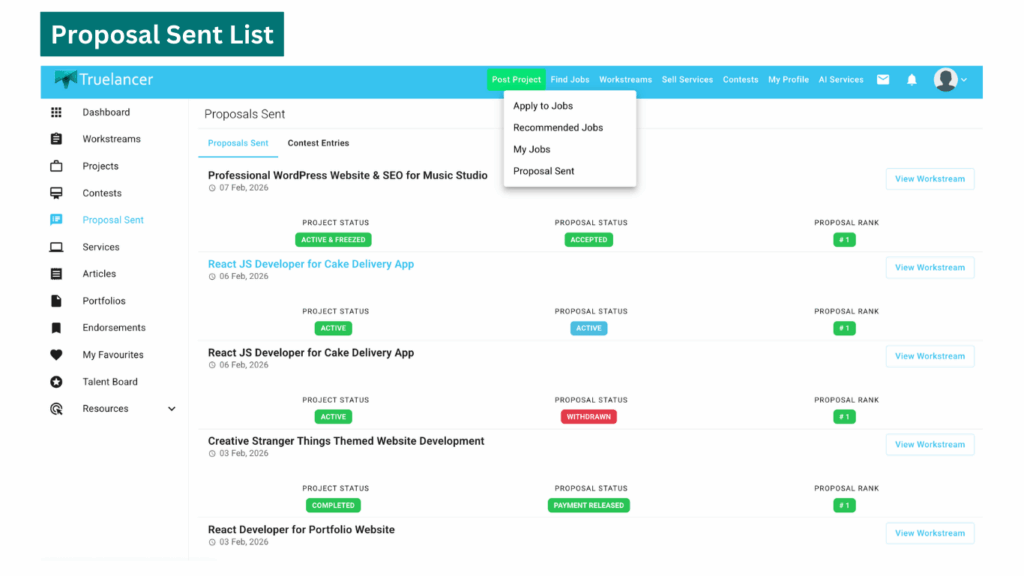
What to click
✅ Find Jobs → Proposal Sent
What you see here
- List of proposals you sent
- Status indicators (active/accepted/withdrawn, etc.)
- Access link to Workstream (when created)
Purpose: This is your proposal tracking dashboard. It helps you monitor opportunities, follow up, and open Workstreams quickly.
Step 13: Workstream: When Client Wants to Discuss or Proceed
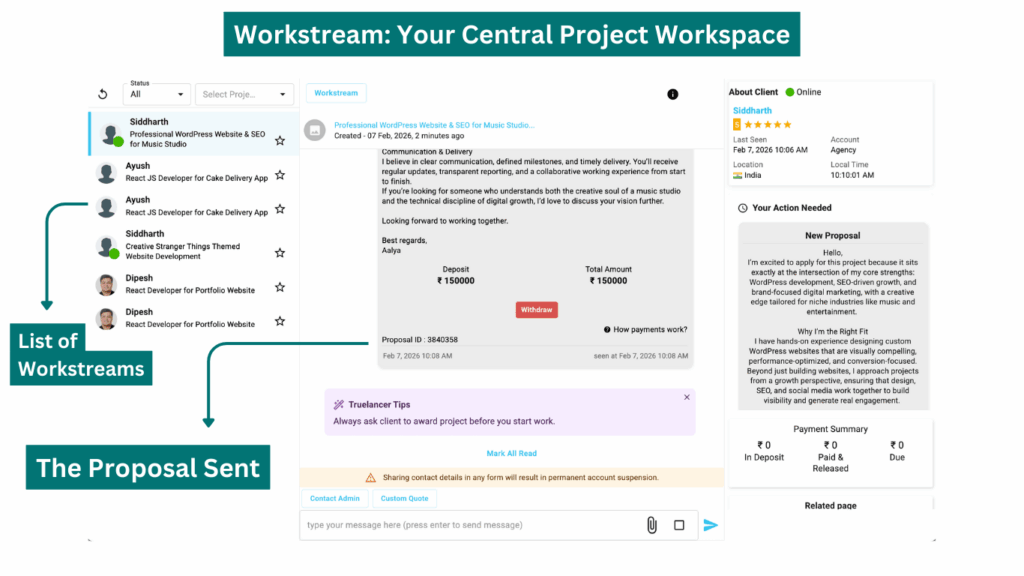
When a client is interested, they create a Workstream.
What is Workstream?
Workstream is the official project communication and management space where:
- proposals are reviewed
- chats happen
- files are shared
- video meetings can be done
- payment requests are handled
- project completion is approved
Purpose: Keeps everything documented and secure inside Truelancer.
Step 14: How to Access Workstream
Method 1: From Proposal Sent
✅ Find Jobs → Proposal Sent → Open Proposal → View Workstream
Method 2: From the Header Workstreams Menu
✅ Click Workstreams in the top header
You may see sub-options like:
- Workstreams
- Chat Rooms
✅ Click Chat Rooms to open all active Workstream chats.
Purpose: Chat Rooms is the fastest way to open all conversations.
Step 15: Workstream Features (What Each Option Does)
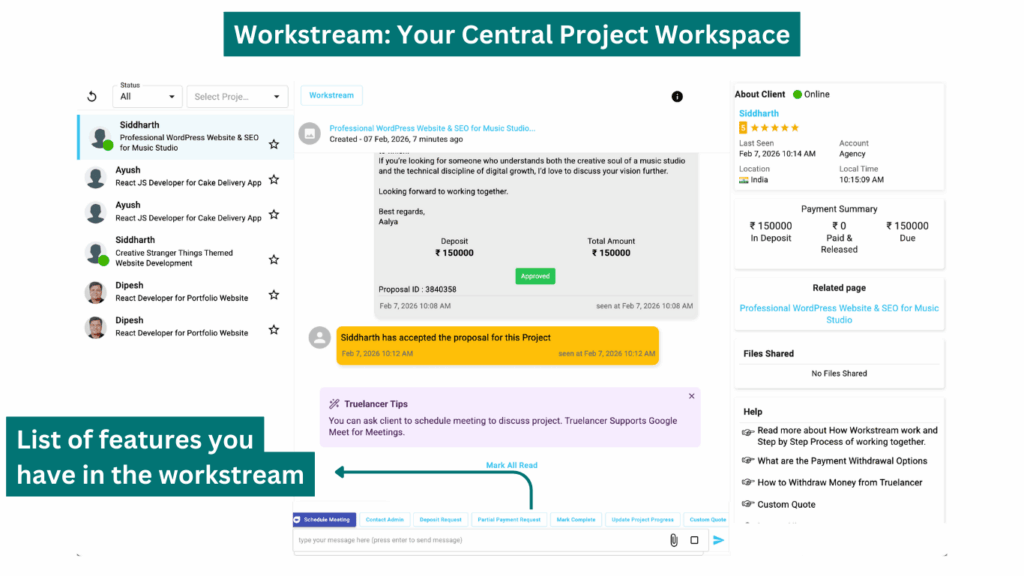
Inside Workstream, freelancers typically have access to:
Messaging box
Purpose: Discuss requirements, scope, milestones, and delivery timelines.
Why important: Keeps communication on-platform for support and proof.
File Sharing
Purpose: Share deliverables, references, and supporting docs in one place.
Video Meeting option
Purpose: For quick alignment discussions when requirements are complex.
Custom Quote (Short explanation + official guide)
Purpose: Used when you want to send a custom-priced offer based on scope.
Official guide: A Step-by-Step Process of Custom Service Quote
Deposit Request
Purpose: Request additional deposit when scope increases (after mutual agreement).
Partial Payment Request
Purpose: Request milestone-based release for work completed.
Mark Complete
Purpose: Officially close project and request final payment release.
⚠️ Strict rule: Do not share personal contact details. Platform warnings indicate accounts can be blocked for violations.
Step 16: Client Accepts Proposal + Deposits Amount (Project Starts)
Once the client accepts your proposal:
- The deposit is placed in escrow
- You see confirmation updates in Workstream
✅ Start work only after project approval confirmation.
Step 17: Maintain Project Flow: Updates, Scope, and Requests
Progress updates
Purpose: Builds trust and reduces disputes.
You can update progress (e.g., 50%) so the client sees steady movement.
Request additional deposit (scope increase)

Purpose: Protects you from unpaid extra work.
How it works:
- Discuss revised scope in chat
- Use Deposit Request
- Client approves and deposits more
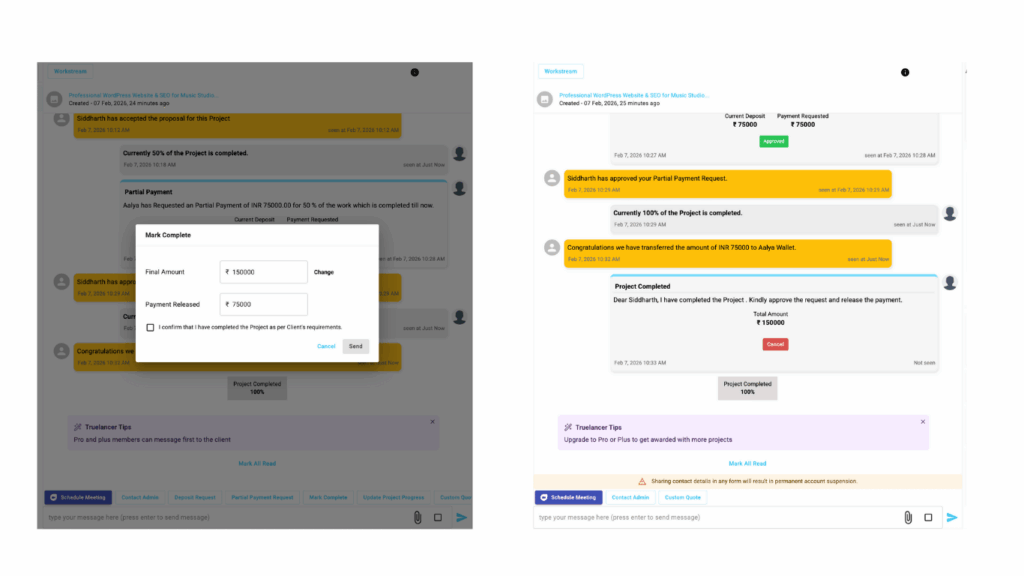
Step 18: Partial Payment Request (Milestones)

Purpose: Helps you get paid in stages for completed work.
How it works:
- Discuss milestone completion with client
- Click Partial Payment Request
- Enter amount
- Confirm completion checkbox
- Send request
- Client approves and releases
⚠️ Released payments are not refundable; only escrow balance can be disputed/refunded per conditions.
Step 19: Final Delivery and Marking the Project as Complete
Before you mark a project as complete on Truelancer, it is important to ensure the work is truly finished and properly handed over to the client.
A) Submit All Final Deliverables First
Before clicking Mark Complete, make sure you have delivered everything the client expected, such as:
- Final files (designs, documents, code, videos, reports, etc.)
- Source files (if included in scope)
- Login credentials or access details (only if permitted within platform rules)
- Instruction notes, documentation, or handover summary (if required)
- Final version links (Drive links, repositories, etc., shared inside Workstream)
✅ Best practice: Always send a clear “Final Delivery Message” in Workstream like:
- What deliverables are included
- Where they are shared
- Any next steps the client should follow (installation, review, etc.)
This reduces confusion and ensures the client can verify your work smoothly.
B) Wait for Client Verification and Final Feedback Cycle
After you submit deliverables, the client may:
- Review the work
- Ask for minor changes
- Request clarifications or improvements
- Provide final feedback or revision notes
At this stage, continue using Workstream messages to:
- Respond quickly
- Resolve feedback professionally
- Share updated versions of files (if required)
✅ You should mark the project complete only when:
- The client confirms delivery is correct, or
- The client has no more feedback pending, or
- Final revisions are completed as per agreement
C) Mark the Project Complete (Workstream Action)
Once everything is delivered and verified, you can officially close the project by marking it complete.
What to click:
- Open the project Workstream
- Find the option Mark Complete (available near the bottom actions)
- Click Mark Complete
- Confirm completion when the platform asks you to verify:
- Work is delivered
- Final deliverables are shared
- Client has reviewed/accepted the outcome
- Submit the completion request
📌 Purpose of Mark Complete:
This is not just a “button click”; it is an official request that tells the client:
✅ “The project is delivered. Please verify and approve so the remaining escrow amount can be released.”
Step 20: Client Approval and Release of Remaining Payment
After you mark the project complete, the client receives a notification and the Workstream shows an action request on the client side.
What happens next:
- The client is prompted to review your completion request
- The client verifies:
- Deliverables received
- Work quality is satisfactory
- No more pending feedback or changes
Client Actions:
The client will have options such as:
- Approve the completion request
- Provide feedback for the freelancer
Once the client approves, the remaining funds held in Safe Deposit (Escrow) are released.
✅ Important Payment Note:
- The client can only release the amount that remains in escrow
- Any amount already released earlier (partial payments) stays released and cannot be reversed
Payment timeline:
Once approved, the remaining payment is usually transferred to your Truelancer Wallet within 24-48 hours.
Step 21: Feedback (Final Step That Builds Your Reputation)
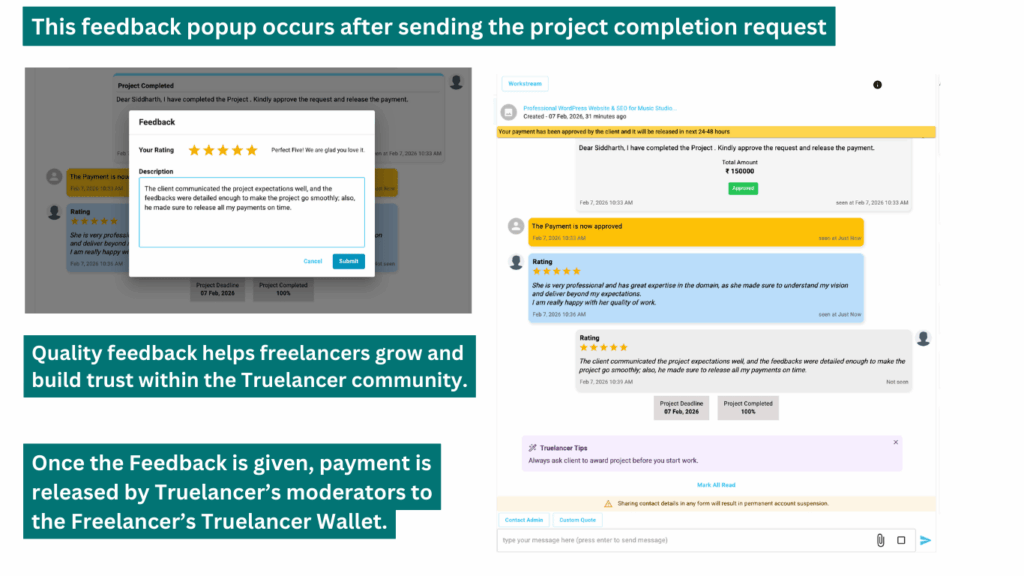
Once the project is officially closed, both parties receive the feedback prompt.
Why feedback matters for freelancers:
Feedback is one of the strongest growth factors on Truelancer because it:
- Builds your public credibility and trust
- Improves your ranking and profile visibility
- Increases your chances of being shortlisted in future projects
- Helps clients decide faster when comparing freelancers
A freelancer with consistent positive feedback typically gets:
- More workstream invites
- Higher proposal acceptance rates
- Stronger long-term client relationships
What to do:
- When the feedback popup appears, select your rating
- Write a short professional review of the client experience (communication, clarity, professionalism)
- Submit the feedback
Once feedback is submitted by both client and freelancer, the project cycle is officially completed.
Withdrawing Your Earnings from Truelancer Wallet
Once your project is completed, approved by the client, and the payment is released, the amount is credited to your Truelancer Wallet.
From your wallet, you can withdraw your earnings to your personal account using a preferred payment method such as Bank Transfer, PayPal, or Payoneer, as supported on the platform.
For a detailed, step-by-step guide on how to withdraw your earnings, please refer to the official help article below:
👉 How to Withdraw Money from Your Truelancer Account
(Click here to view the complete withdrawal process)
This guide explains everything you need to know about creating a withdrawal request, available payout methods, and processing timelines.
✅ Workflow Completed
At this point, you’ve successfully gone through the full Truelancer freelancer workflow:
Proposal → Workstream → Escrow → Delivery → Mark Complete → Payment Release → Feedback
Happy Freelancing on Truelancer 🚀
Top Freelancers by Country
- Freelancers in India
- Freelancers in Pakistan
- Freelancers in the USA
- Freelancers in Bangladesh
- Freelancers in the Philippines
- Freelancers in Kenya
- Freelancers in Indonesia
- Freelancers in Brazil
- Freelancers in Sri Lanka
- Freelancers in United Kingdom
Top Freelancers by Skills
- Photoshop Freelancers
- Data Entry Freelancers
- HTML5 Freelancers
- PHP Freelancers
- HTML Freelancers
- Website Design Freelancers
- javascript Freelancers
- Graphic Design Freelancers
- CSS Freelancers
- Logo Design Freelancers


One comment on “Complete Freelancer Workflow on Truelancer: Step‑by‑Step Guide (From Bidding to Final Feedback)”
Comments are closed.