Hiring freelancers online should feel structured, transparent, and secure, not confusing or risky.
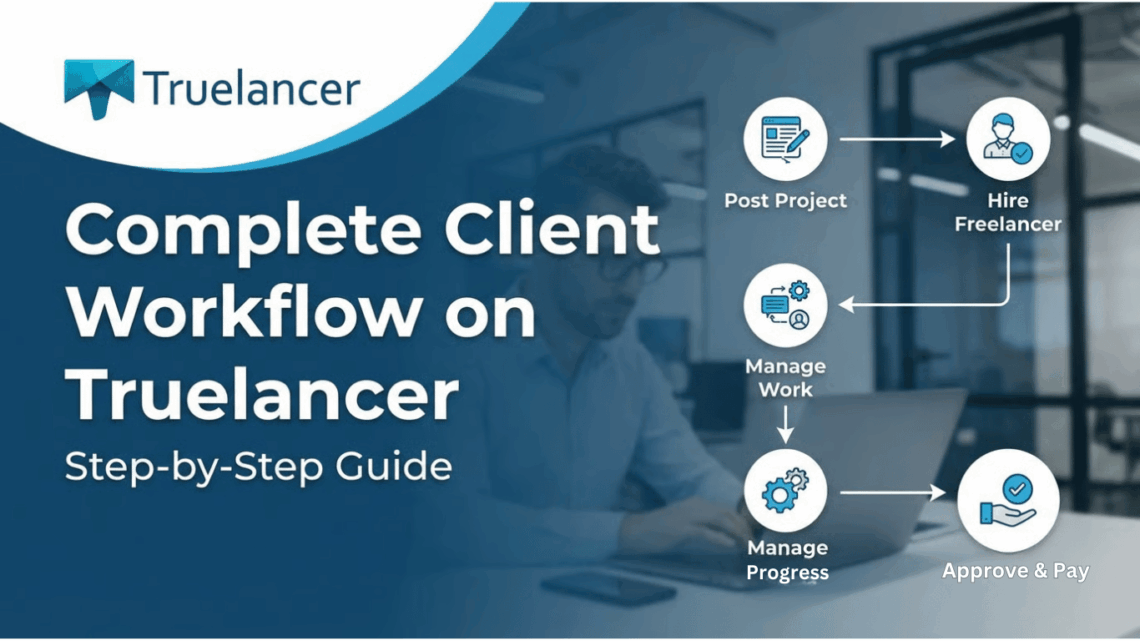
This detailed guide walks you through the complete client workflow on Truelancer, starting from posting a project and reviewing proposals to making secure payments, managing work through milestones, handling refunds if needed, and finally closing the project with feedback.
Whether you are hiring a freelancer for the first time or managing long-term projects, this guide explains every feature you will encounter, why it exists, and how to use it effectively, exactly as it appears on the Truelancer platform.
By the end of this guide, you will have a clear understanding of:
- How to post a project and evaluate freelancers
- How payments, escrow, and partial releases work
- How to manage work using Workstream
- How refunds, disputes, and final closures are handled
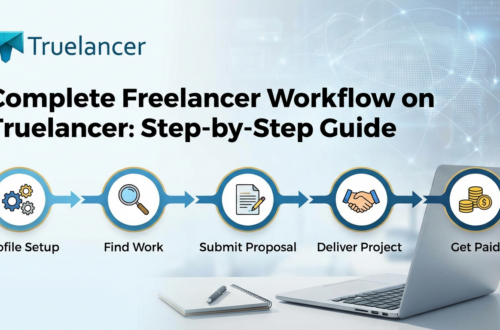
Step-by-Step: Client Journey
Step 1: Go to Your Dashboard & Click “Post Project”
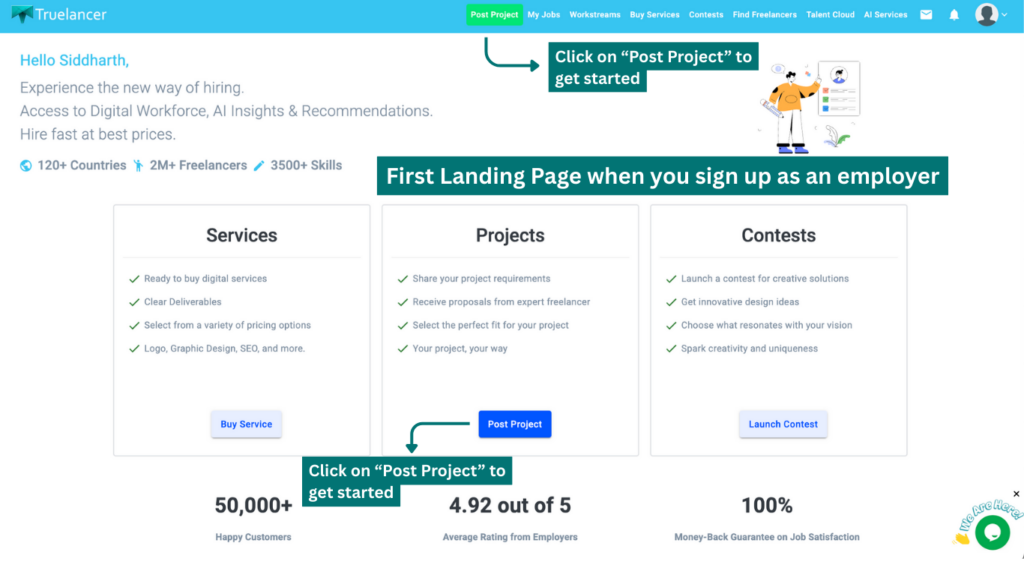

After you sign up and log in, you land on the Dashboard.
At the top, you’ll find the main actions like:
- Buy Services (purchase ready-made packages)
- Contests (get multiple creative entries)
- Post Project (hire a freelancer for your custom requirement)
✅ To start hiring for your custom work, click Post Project.
Step 2: Create Job Posting with AI (Fast Mode)
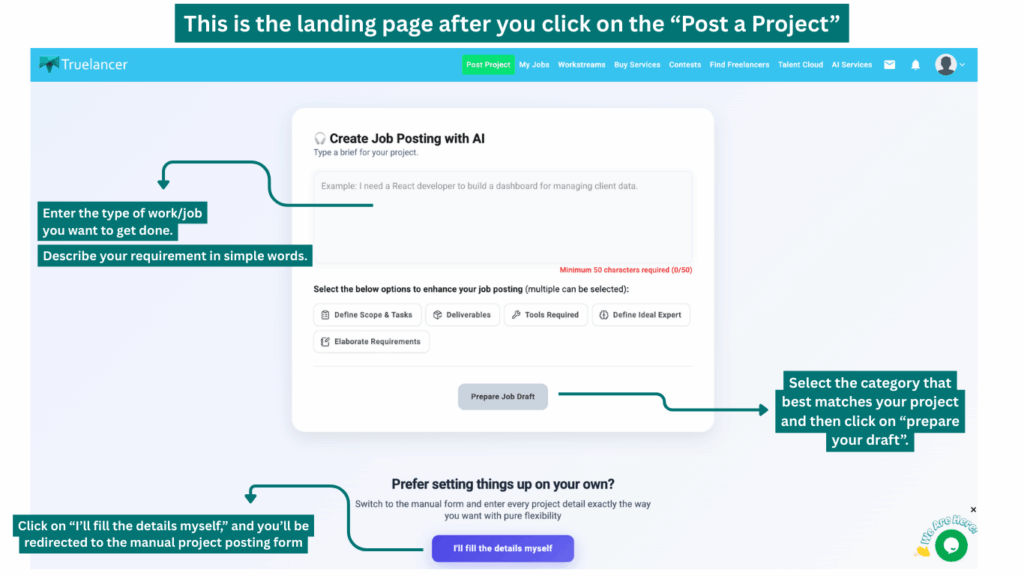
Once you click Post Project, you’ll see the Create Job Posting with AI screen.
What this feature does
This is the “type it like you’d explain it to a human” method.
You simply enter a brief description of what you need (example shown on the page), and Truelancer helps you prepare a more complete job post, without you manually filling every field.
Options you can use to enhance your job post
You’ll see buttons that help the AI structure the project better:
- Define Scope & Tasks – Helps list what needs to be done step-by-step.
- Deliverables – Helps define what you expect at the end (files, pages, formats, etc.).
- Tools Required – Helps mention tools/tech you want the freelancer to use.
- Define Ideal Expert – Helps describe the type of freelancer you’re looking for (experience level, niche, etc.).
- Elaborate Requirements – Adds more context so proposals are more accurate.
When ready, click Prepare Job Draft.
✅ Best part: Even if AI fills things for you, you can still edit everything later.
Step 3: Prefer Manual Posting? Click “I’ll fill the details myself”
Not everyone wants AI to do the heavy lifting, and that’s totally fine.
If you click I’ll fill the details myself, you’ll be redirected to the manual project posting form where you enter everything step-by-step.
Step 4: Fill the Project Posting Form (Field-by-Field)
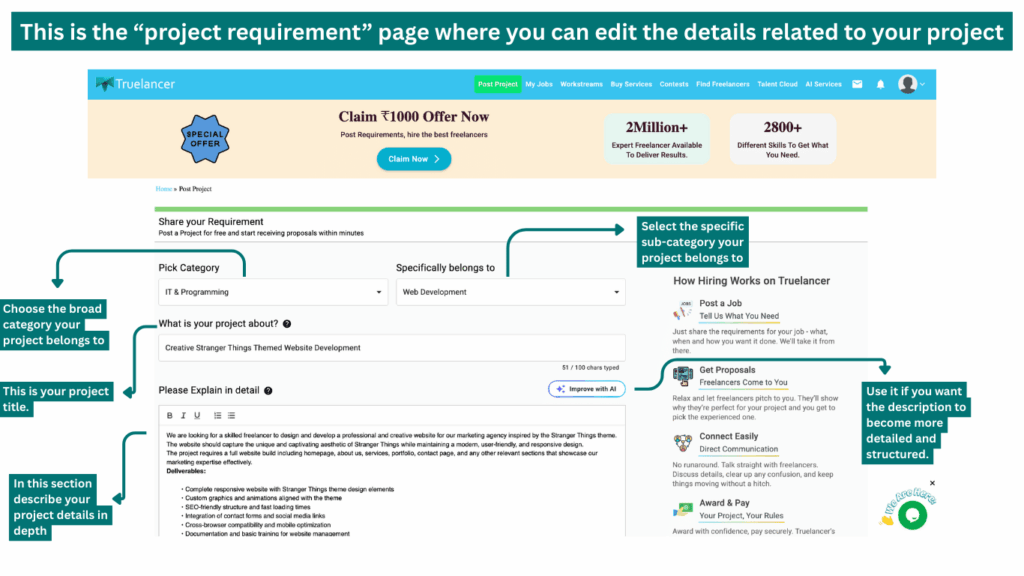
Whether you used AI or manual mode, you’ll reach the project posting form where details can be reviewed and edited.
Below is what each section means and what you should fill:
1) Pick Category
Choose the broad category your project belongs to (example shown: IT & Programming).
✅ This helps your job reach the right freelancers.
2) Specifically belongs to
Select the specific sub-category (example shown: Web Development).
✅ This improves targeting and proposal relevance.
3) What is your project about?
This is your project title.
✅ Keep it clear and searchable.
Example: Creative Stranger Things Themed Website Development
4) Please explain in detail
This is the most important part: your project description.
Here you should include:
- What you want to get done
- features/specifications needed
- Design style or references
- Deadline expectations
- Any special requirements
You’ll also see an “Improve with AI” option here.
✅ Use it if you want the description to become more detailed and structured.
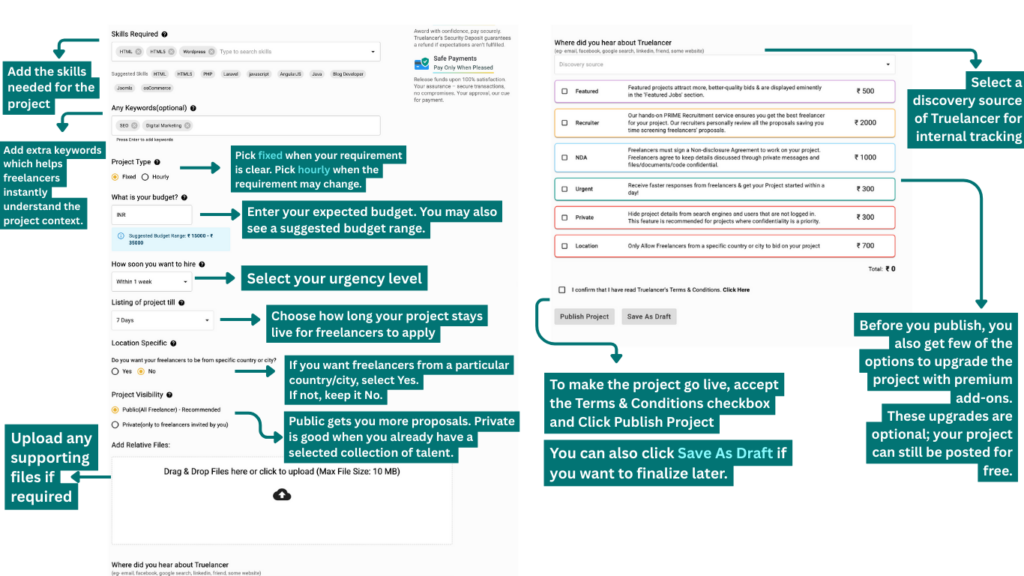
5) Skills Required
Add the skills needed for the project (example shown: HTML, HTML5, WordPress).
✅ This helps match you with relevant freelancers and improves shortlisting quality.
6) Any Keywords (Optional)
Add extra keywords like SEO, Digital Marketing, etc.
✅ Helps freelancers instantly understand the project context.
7) Project Type
You can choose:
- Fixed – one total price for the full project
- Hourly – pay per hour (best when the scope is evolving)
✅ Pick fixed when your requirement is clear. Pick hourly when the requirement may change.
8) What is your budget?
Enter your expected budget. You may also see a suggested budget range.
✅ Setting a realistic budget improves the quality of proposals you receive.
9) How soon you want to hire
Select your urgency level (example: Immediate / Within 1 week, etc.).
✅ This tells freelancers how fast you want to start.
10) Listing of project till
Choose how long your project stays live for freelancers to apply (example shown: 7 days).
✅ Longer duration = more proposals.
11) Location Specific
If you want freelancers from a particular country/city, select Yes.
If not, keep it No.
✅ Useful when time zone, language, or compliance matters.
12) Project Visibility
You can choose:
- Public (All Freelancer): Recommended
- Private (only to freelancers invited by you)
✅ Public gets you more proposals. Private is good when you already have a selected collection of talent.
13) Add Relative Files
Upload any supporting files (max size shown: 10 MB), like:
- reference designs
- documents
- requirements PDF
- logo / brand kit
✅ Sharing files early reduces confusion later.
14) Where did you hear about Truelancer
Select a discovery source (email, Facebook, Google, LinkedIn, etc.).
✅ Quick selection, helps internal tracking.
Step 5: Upgrade Your Project (Optional Premium Features)
Before you publish, you also get the option to upgrade the project with premium add-ons.
These upgrades are optional; your project can still be posted for free.
✅ Featured
What it does: Your project gets stronger visibility (shown more prominently in “Featured Jobs”).
Best for: Getting more proposals faster and improving proposal quality.
✅ Recruiter
What it does: Truelancer recruitment team personally reviews proposals and helps shortlist the best freelancers.
Best for: Clients who don’t want to spend time screening proposals and want faster hiring.
✅ NDA
What it does: Freelancers must agree to a Non-Disclosure Agreement.
Best for: Confidential projects involving sensitive documents, code, or business info.
✅ Urgent
What it does: Helps you receive faster responses and potentially start the project sooner.
Best for: Tight timelines.
✅ Private
What it does: Hides project details from search engines and users who are not logged in.
Best for: Confidential postings and privacy-first hiring.
✅ Location
What it does: Restricts bidding to freelancers from a specific country or city.
Best for: Region-specific projects or compliance needs.
Step 6: Publish Your Project (Free Option Available)
If you don’t want upgrades, no worries, post it for free.
To publish:
- Accept the Terms & Conditions checkbox
- Click Publish Project
You can also click Save As Draft if you want to finalize later.
Step 7: View Project Details & Receive Proposals
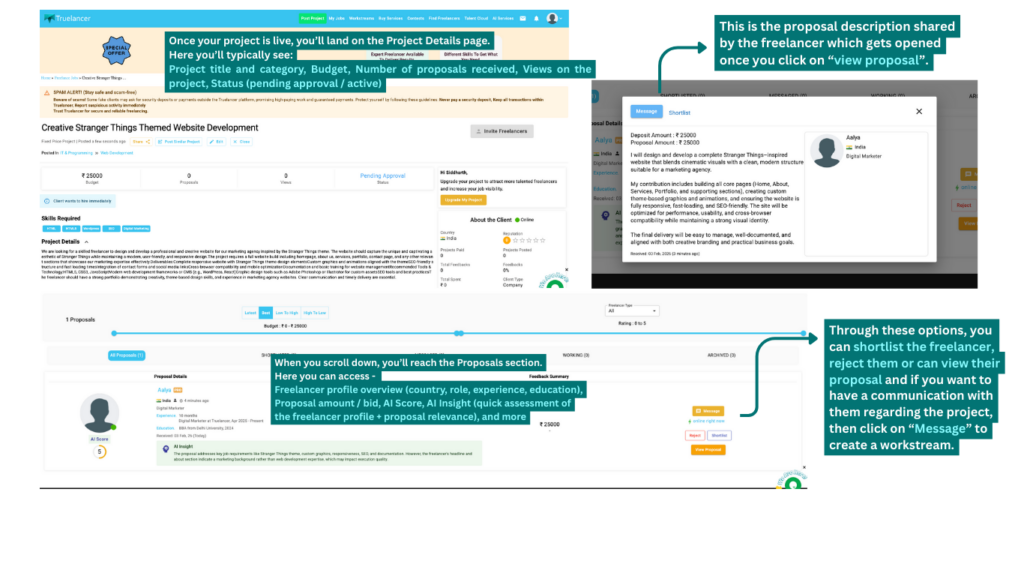
Once your project is live, you’ll land on the Project Details page.
Here you’ll typically see:
- Project title and category
- Budget
- Number of proposals received
- Views
- Status (pending approval / active)
You may also see:
- A Spam Alert banner (reminding users to keep transactions on-platform)
- “Upgrade My Project” prompts (optional)
- “Invite Freelancers” option (if you already have specific people in mind)
Step 8: Analyze Freelancer Proposals (Shortlist, Reject, Message)
When you scroll down, you’ll reach the Proposals section.
Proposal list features you can use
You’ll get filters and sorting to help you scan faster:
- Sort by Latest / Best / Low to High / High to Low
- Budget slider range
- Filters like Freelancer Type and Rating
What you see on each proposal card
Each proposal typically shows:
- Freelancer profile overview (country, role, experience, education)
- Proposal amount / bid
- AI Score
- AI Insight (quick assessment of the freelancer profile + proposal relevance)
Actions available to you
You can instantly take action using:
- Shortlist: Save the freelancer in your shortlisted tab
- Reject: Remove from consideration
- Message: Start a conversation
- View Proposal: Open and read full proposal details
✅ This is where you decide who looks like the best fit, not just based on price, but also clarity, experience, and AI insights.
Step 9: Explore Talent Cloud and Invite Freelancers
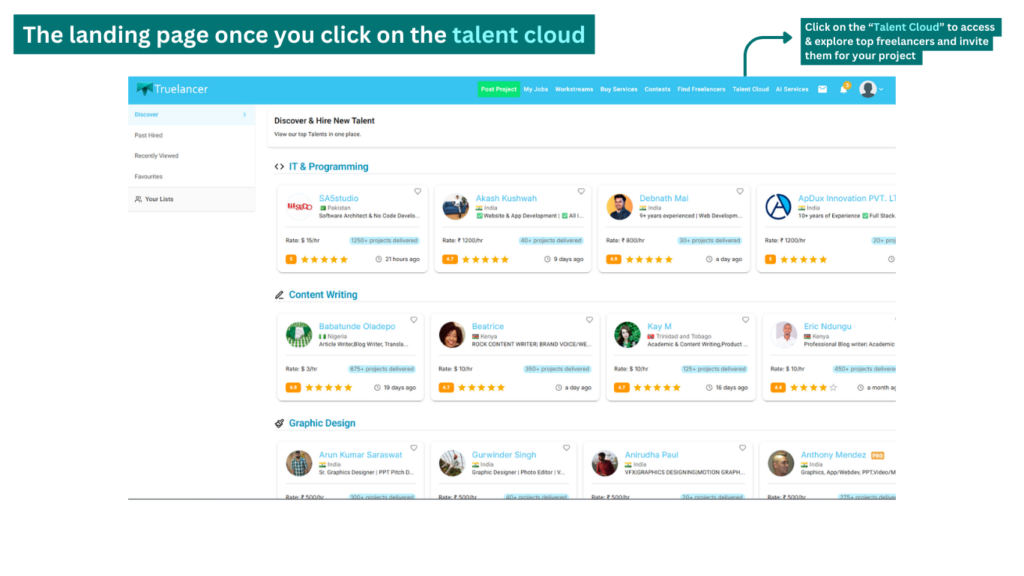
Posting a project and receiving bids is not the only way to hire on Truelancer. If the proposals you receive are not aligned with your expectations, or if you prefer to personally explore and invite top freelancers, Truelancer provides a powerful feature called Talent Cloud.
You can access Talent Cloud directly from the top header on your dashboard.
Talent Cloud Options Explained
Once inside Talent Cloud, you will find four sections:
1. Discover
The Discover section showcases some of Truelancer’s best freelancers across different industries and skill categories.
Here, you can:
- Browse verified freelancer profiles
- Check ratings, reviews, skills, and hourly rates
- View availability and experience
This is ideal when you want to proactively search for high-quality talent instead of waiting for bids.
2. Past Hired
The Past Hired section displays freelancers you have previously worked with.
This helps clients:
- Rehire trusted freelancers
- Maintain continuity for ongoing or repeat work
- Save time searching again
3. Recently Viewed
This section lists freelancer profiles you have recently visited.
It allows you to:
- Quickly return to shortlisted profiles
- Compare freelancers before making a decision
4. Favourites
In Favourites, you can save freelancer profiles you like for future reference.
This feature is useful for:
- Building a shortlist
- Planning future projects
Inviting Freelancers to Your Project
From any freelancer profile, you can click on Hire Me.
You will then:
- Select the project you want the freelancer to bid on
- Send an invitation directly to the freelancer
The freelancer receives the invitation and can submit a proposal for your specific project.
Step 10: Click “Message” to Create a Workstream
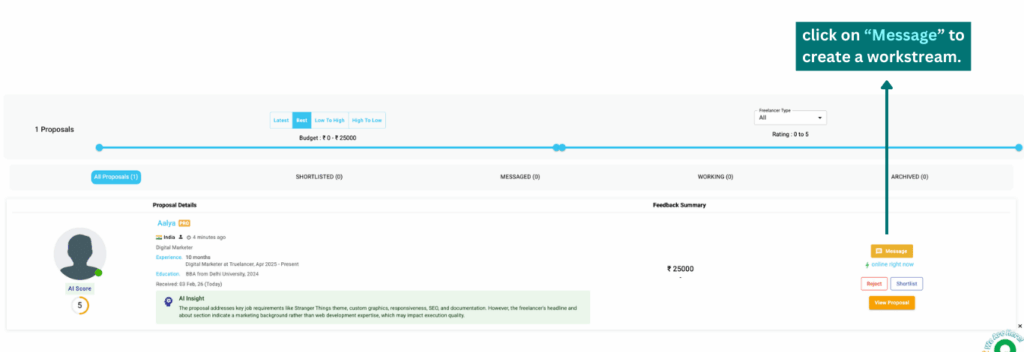
Once you find a freelancer you want to talk to, click Message.
This creates a dedicated Workstream for that freelancer + your project.
Inside Workstream, you can:
- Discuss requirements and timelines
- Share files and important documents
- Schedule a meeting / video call
- Keep everything recorded in one place for safety
What is Workstream?
Workstream is a single place of communication between the Client and Freelancer regarding any particular Project or Service.
All communications, proposals, payment requests, and project updates can be found inside Workstream.
📌 Recommendation: Keep all communication inside Workstream so Truelancer can assist in case of any conflict or dispute.
Reviewing, Comparing, and Evaluating Freelancer Proposals
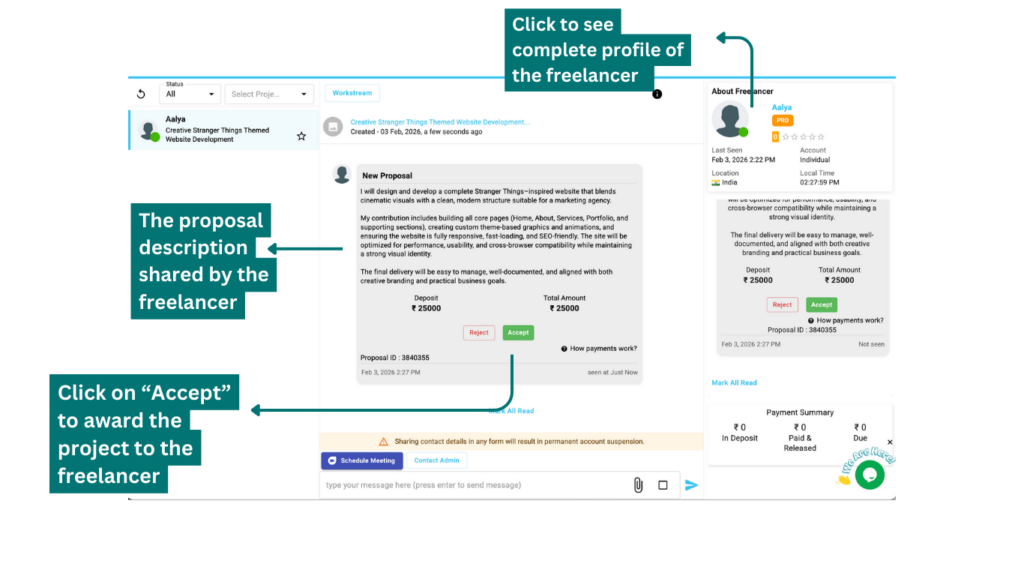
Once freelancers start submitting proposals, the client can view each proposal directly inside the Workstream.
For every proposal received, the client can clearly see:
- The proposal description shared by the freelancer
- The price quoted for the project
- The deposit amount requested to begin the work
On the right-hand side of the Workstream, detailed information about the freelancer is displayed, including:
- Freelancer name and profile type
- Ratings and reviews from previous clients
- Location and availability status
By clicking on the freelancer’s name, the client can access the complete freelancer profile to review experience, skills, portfolio, work history, and feedback.
Step 11: Accept the Proposal and Award the Project
After reviewing all proposals, freelancer profiles, pricing, and discussions, the next step is to finalise the freelancer you wish to work with.
In the Workstream, click on the Accept button available on the selected proposal. This action officially awards the project to the freelancer.
Once accepted:
- The project status changes to In Progress
- The freelancer is notified immediately
- You are redirected to the secure payment (escrow) page
This step confirms the collaboration and initiates the protected payment flow.
Step 12: Secure Your Payment Using Escrow

After accepting the proposal, you are redirected to Truelancer’s secure payment page to add funds to escrow.
The deposited amount is held safely with Truelancer and is not released to the freelancer automatically. Funds are released only when you approve the work or a payment request.
This escrow system ensures:
- Complete payment security for clients and freelancers
- Fair and transparent transactions
- Controlled release of funds based on work progress
Step 13: Choose Your Payment Method
Payment Options for Indian Clients
Indian clients can choose from the following payment methods:
- Credit Card / Debit Card / UPI / Net Banking: Transaction Fee: 2.40%
- PayU Money: Transaction Fee: 2.40%
Bank transfer options such as IMPS / NEFT / UPI are available with zero transaction fees.
Payment Options for International Clients
International clients can use:
- Credit or Debit Cards: Transaction fee as per country charges
- PayPal: Transaction fee as per country charges
Once the payment is successfully processed, you are redirected back to the Workstream.
Step 14: Workstream: Your Central Project Workspace
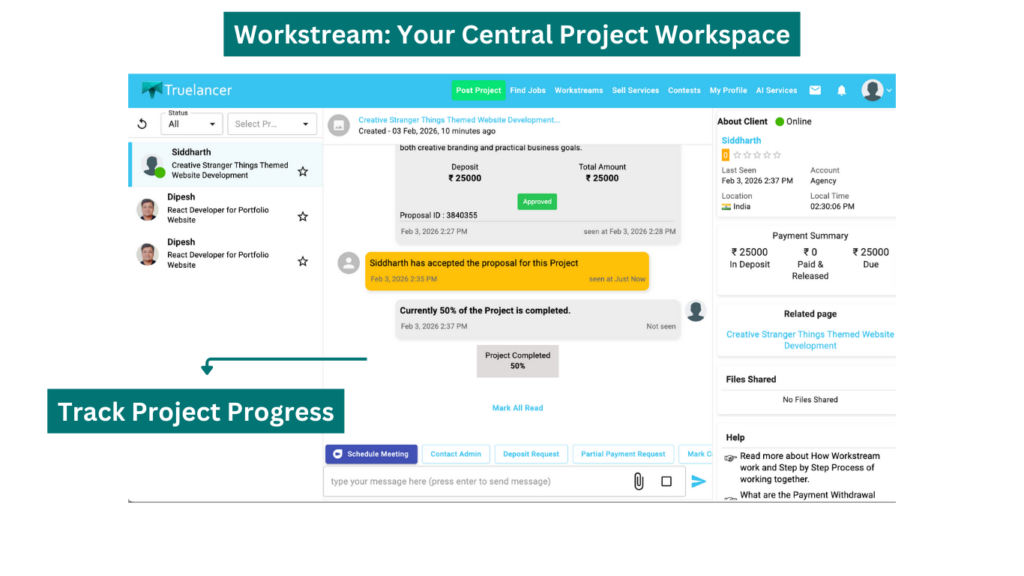
After payment, the Workstream becomes the central place for managing the project.
From the Workstream, clients can:
- Communicate with the freelancer
- Share files and documents
- Schedule meetings or discussions
- Track payment summaries
- Contact Truelancer support if required
All project-related communication and updates remain organised in one place.
Step 15: Tracking Project Progress
As work progresses, freelancers can post project completion updates such as percentage milestones (for example, 50% completed).
These updates help clients:
- Monitor progress
- Align expectations
- Decide on partial or final payments
Step 15: Partial Payment Requests
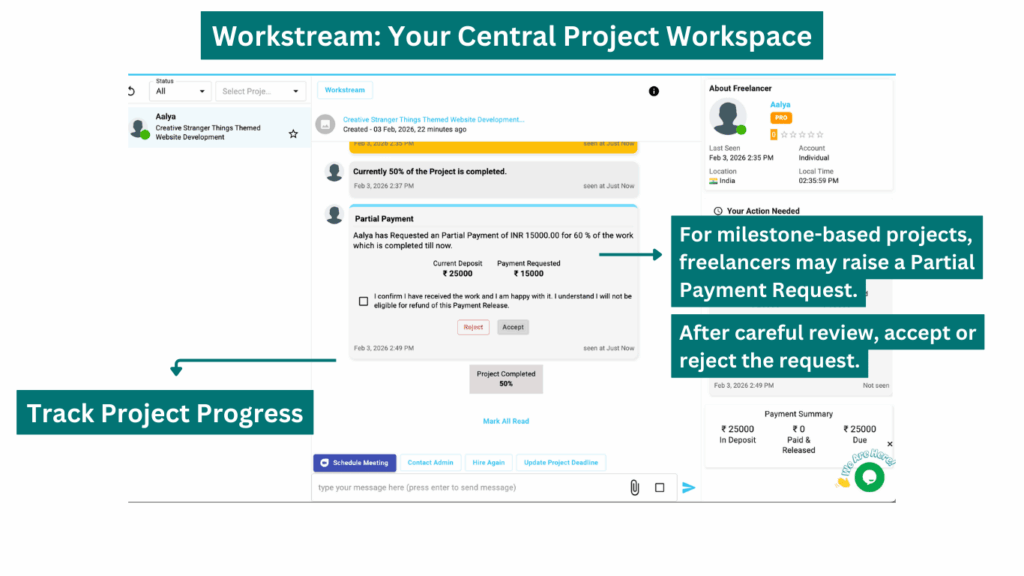
For milestone-based projects, freelancers may raise a Partial Payment Request.
When a partial payment request is raised:
- The request appears directly in the Workstream
- The requested amount and completed percentage are clearly mentioned
Clients can:
- Accept the request if satisfied with the delivered work
- Reject the request if revisions or clarifications are needed
Before approving, the client must confirm that:
- The work has been received
- The delivered work meets expectations
Once approved, the released amount is transferred to the freelancer’s Truelancer Wallet within 24-48 hours.
⚠️ Released payments are non-refundable. Only the remaining escrow balance is eligible for refund.
Step 16: Requesting a Refund (If Required)
Clients have the option to request a refund directly from the Workstream if the project does not proceed as expected or if a dispute arises.
Important refund conditions:
- Refunds apply only to the amount still held in escrow
- Amounts already released to the freelancer cannot be refunded
All refund requests are reviewed by Truelancer to ensure a fair resolution.
Step 17: Final Work Completion Request
Once the freelancer completes the entire project, they send a Work Completion Request through the Workstream.
The client should:
- Review the final deliverables
- Confirm that all agreed work has been completed
- Approve the completion request
Step 18: Release Final Payment
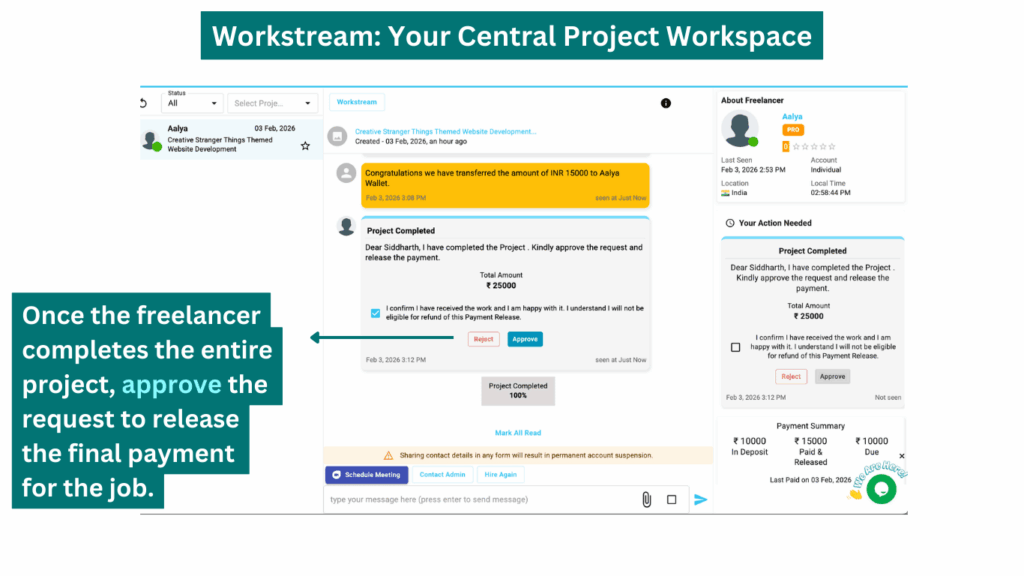
After approving the Work Completion Request, the client releases the remaining escrow amount.
Once released:
- The project is marked as 100% completed
- The payment cycle for the project is closed
Step 19: Client Feedback for the Freelancer
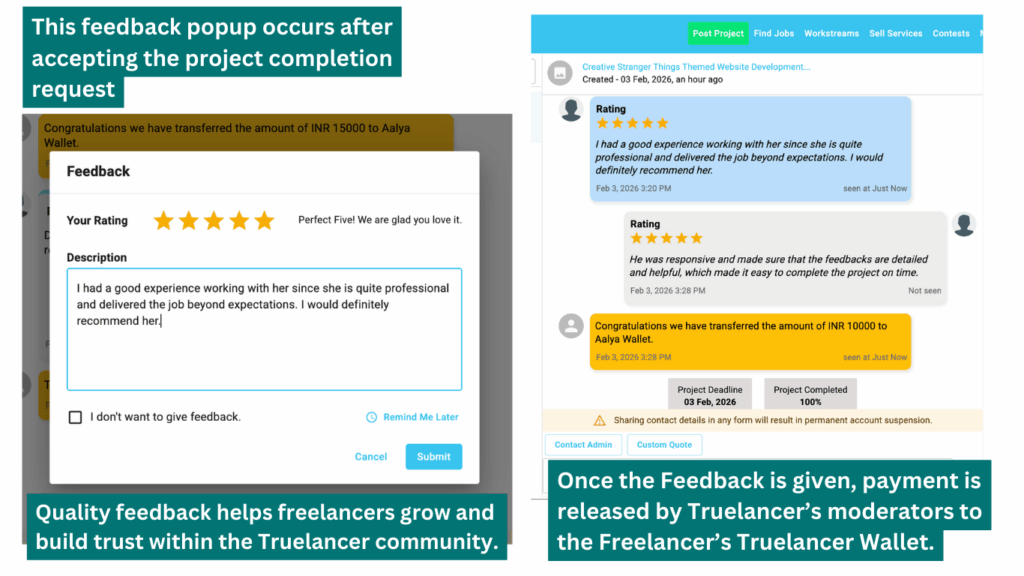
After completing the payment process, clients are redirected to the Feedback page.
Here, clients can:
- Rate the freelancer
- Share their experience
- Provide constructive feedback
Quality feedback helps freelancers improve visibility and build trust within the Truelancer community.
Step 20: Freelancer Feedback and Payment Confirmation
Once feedback is submitted by both the client and freelancer:
- Truelancer moderators verify the completion
- The payment is confirmed and credited to the freelancer’s Truelancer Wallet
Client Workflow Completed
From posting a project to releasing the final payment and sharing feedback, this structured workflow ensures:
- Secure payments through escrow
- Transparent communication
- Controlled milestones and refunds
- A smooth collaboration experience
Happy Truelancing 🚀
Top Freelancers by Country
- Freelancers in India
- Freelancers in Pakistan
- Freelancers in the USA
- Freelancers in Bangladesh
- Freelancers in the Philippines
- Freelancers in Kenya
- Freelancers in Indonesia
- Freelancers in Brazil
- Freelancers in Sri Lanka
- Freelancers in United Kingdom
Top Freelancers by Skills
- Photoshop Freelancers
- Data Entry Freelancers
- HTML5 Freelancers
- PHP Freelancers
- HTML Freelancers
- Website Design Freelancers
- javascript Freelancers
- Graphic Design Freelancers
- CSS Freelancers
- Logo Design Freelancers